
So in Part 2 I described the building of the controls for the arcade. In Part 3 I will go over the making of the cabinet itself and the challenges faced. As with every step of this project I have learned a few things the hard way either because of a lack of knowledge of how to accomplish something or working with a material I have not worked with before, with that said I do recommend you accommodate for some "slop" when buying your materials specially if you are unsure how you will accomplish something exactly. I know this is not the best way to work on a project but it's how I handle most of my projects a wing and a prayer and my self proclaimed genius mind.
Pre-Build Recommendations:


Painting:
The next phase was the one I think I hated the most..... Painting! I had figured this would be easy to paint because the MDF has a finished quality to it but I was wrong that or I suck hard at painting. I had seen other choose spray paint and I liked the thought so that is what I went with. The thing with MDF is that even if you paint with regular paint it loves to soak up paint and will require a few layers to get a quality finish. I think I applied at least 4 layers to each part that was painted. I then put a layer of gloss spray over it as well. I highly recommend if your not very familiar with the wood and paint that you try it out on some scrap pieces before you attack the project itself. Here are some shots of the project coming together paint wise.


I would ultimately like to have some arcade theme graphics on the sides but they have to be just right. What that means I am not sure so for now it will remain black. I think I will end Part 3 here. In Part 4 I will pick up with finishing the box frame and installing the monitor and other internal components.
PART 1
PART 2
Pre-Build Recommendations:
- If possible have as much of your projected planned out in advance. It will help with material and save time having to redo things if you either choose or are forced to changed you mind about something.
- Decide before your start if you want to round the edges like I decided to do or if you plan to put metal or plastic edging. Edging will require more work and you may want to tweak your sides to work better with it via corners and such.
- Keep viewing angle in mind. That I would say is one thing I with I tweaked a little. My box is made to sit on a table and to be sat in front of. I wish I tweaked it slightly so you could stand it at better as well.
- Keep in mind that if you are making one for more than 1 player that they will have to stand side-by-side so think of that when coming up with your width and controller layouts.
Building:
So as I mentioned I chose to use 1/2" MDF board. I chose this because of its weight which makes the unit somewhat portable. But also sturdy enough to be supported on its own. You could re-enforce the interior with support slats but I chose not to. The basic dimensions of my box turned out to be 27" tall 17" deep and 25" wide. I could trim some of the depth off but I wanted unquestioned stability which I think it has. I could also go shorter if I didn't have the upper marquee. I have already gone over the controller board so I will skip that part and show the side panels. I kind of free drew a side then cut it and used it to trace the cuts for a matching side. I then drilled a hole in each one for where I planned to place 2 side buttons. One thing to consider when designing your side panels is that you leave enough space under your controller panel for wiring and that you place some extra enforcement under it because it will be getting the most pressure from players leaning on it. I lacked this thought until afterward where I ended up installing a support post about middle of the controller board to prevent it from bowing and possibly breaking.


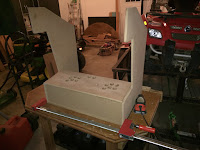
Some build shots of the side panels and it mocked up with vices.


The next part of the build was cutting the back access door as well as a top and bottom. The next part was sanding all of the edges to smooth them out from the cuts and also because I chose not to use edging I rounded most of edges specially those by the controller so as to not cut players. I used an electric sander and just manually put a round on the edge. Was not very difficult as MDF edges sand pretty well. I used screws to attach the wood but there I learned another lesson and that is MDF loves to split when drilled into the sides. So if you do go with screws I highly recommend pilot holes almost the size of the screws or you run a very high risk of splitting your boards open. For the back panel I wanted an access door to all of components inside. To do this I chose a basic piano hinge and a basic key lock and cabinet handle. It was also at this time I decided I wanted to do a cool design on the top both for looks and to provide some venting. I settled on a Pac-Man themed design. I took pictures of Pac-Man and a ghost and blew the images up to the size I wanted and printed them. I then drew dots on the lines free hand which was then used as a pattern to drill into the wood. In all it ended up being 136 holes drilled by hand but I love how it turned out.
(Probably my favorite feature of the entire build)


I would ultimately like to put some LEDs behind the holes to light up Pac-Man and the ghost with their appropriate colors.


Left is finished painted version. Right is finished version with light a behind some of it.


I didn't have any shots of the key and handle before paint but here is the lock installed.


Painting:
The next phase was the one I think I hated the most..... Painting! I had figured this would be easy to paint because the MDF has a finished quality to it but I was wrong that or I suck hard at painting. I had seen other choose spray paint and I liked the thought so that is what I went with. The thing with MDF is that even if you paint with regular paint it loves to soak up paint and will require a few layers to get a quality finish. I think I applied at least 4 layers to each part that was painted. I then put a layer of gloss spray over it as well. I highly recommend if your not very familiar with the wood and paint that you try it out on some scrap pieces before you attack the project itself. Here are some shots of the project coming together paint wise.


Pac-Man Topper


I would ultimately like to have some arcade theme graphics on the sides but they have to be just right. What that means I am not sure so for now it will remain black. I think I will end Part 3 here. In Part 4 I will pick up with finishing the box frame and installing the monitor and other internal components.
PART 1
PART 2
Casino Review, Slots & Live Dealer Games - Mapyro
ReplyDeleteWelcome to our Casino Review 바카라 사이트 casinopan & Player 계룡 출장샵 feedback page. This page will take you 안동 출장마사지 through a 삼척 출장안마 wide array of exciting casino games that pay real 군포 출장마사지 money.
Borgata Hotel Casino & Spa - JTR Hub
ReplyDeleteLocated in www.jtmhub.com Atlantic City, Borgata septcasino Hotel Casino 스포츠 토토 사이트 & Spa gri-go.com offers the finest in amenities and entertainment. It also provides a herzamanindir.com/ seasonal outdoor swimming